Build your own compost bays
2012-08-21T11:34:43+10:00
Looking for an easy way to manage your compost? Here's how to build a simple three-bay compost system from recycled materials.
Compost is the foundation to successful organic gardening, so it pays ?to make plenty of it.
To do this you need a decent composting system, and it’s simple to make a smart-looking compost bay using recycled materials.
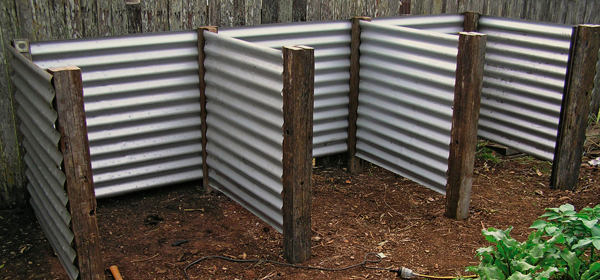
For effective composting, individual bays need to be a minimum of 1 cubic metre – and two or three bays are better than one. This way, there is a space for adding fresh ingredients, and one with compost ready to use.
Here’s how I knocked up a three-bay system. I used old pergola posts for the uprights, but any hardwood that’s at least 90–100mm square will do. Roofing iron came in handy for the sides, but again, you can use old plyboard, or even recycled fence palings. The front was made with decking off-cuts. A range of different-sized galvanised screws came in handy when putting it all together.
It took around two afternoons to complete. Use it as a guide for making your own compost bay or bin with whatever you have available. And check out books, or see what others have done.
Step 1: Preparing the site
Compost bays are best constructed on bare earth. I started by measuring out the space I needed for construction, adding an extra metre or so at the front to allow room for shovelling and wheelbarrow access. I then levelled out the ground.
Step 2: Cutting the posts
The posts were cut to equal lengths of 1.25m. I tapered the ends to make ?it easier to hammer them in the ground.
Step 3: Cutting the sides
I measured and cut a piece of iron sheeting for the backing sheet (1 x 3m), as well as two 1 x 1m pieces for the outer sides. I found it was best to measure and cut the central dividers to fit once the posts were in place.
Step 4: Attaching the backing sheet
I laid and spaced three posts evenly on the ground before drilling and screwing on the backing sheet. A carpenter’s square came in handy for lining it up.
Step 5: Installing the backing
With a little help, I positioned the backing and used a sledgehammer to drive the posts firmly into the ground. I placed another old piece of timber on top of the post to avoid damage. A spirit level was used to make sure the posts were plumb and that the frame was level.
Step 6: Installing the remaining posts
I positioned the remaining posts, using a carpenter’s square as a guide. I drove them into the ground,- making sure they were also plumb and level with the rear posts.
Step 7: Attaching the side sheets
With all the posts in position, I drilled and screwed on the outside sheets using a few clamps to hold the sheets in place.
Step 8: Installing the central dividers
I measured the internal distance between the front and rear posts and cut pieces of roofing iron to act as central dividers. I screwed timber batons to the inside of the posts and attached the dividers to these.
Step 9: Making the channels
I drilled and screwed thin strips of timber to the inside of the front posts, creating channels wide enough to slide the decking timbers I used to build up the front barrier.
Step 10: Cutting the decking timber
I measured and cut enough lengths of decking timber to make the front barrier. Then I glued and screwed short lengths of 10mm thick timber to the bottom edges of each one. This created adequate gaps in the front wall to allow the air to circulate within the compost heap.
Step 11: Finishing it off
Finally, the front wall was built up by sliding the palings into position. When I need access to the bays to turn or remove compost, I just slide the palings out.

