How to dry herbs
2020-12-06T01:00:02+11:00
Summer's a great time to dry herbs. It's also the time when most of them should be harvested. Here's how to do it.
Summer’s a great time to dry herbs and, fortunately, this is also the time when most of them should be harvested. The object is to get rid of the 70–80 per cent water content as quickly as possible. Choose a place out of direct sunlight with good air movement, some warmth, and as little moisture in the air as possible. The final colour of the dried herb is a good indication of the volatile oil content; the better the colour, the higher the content.
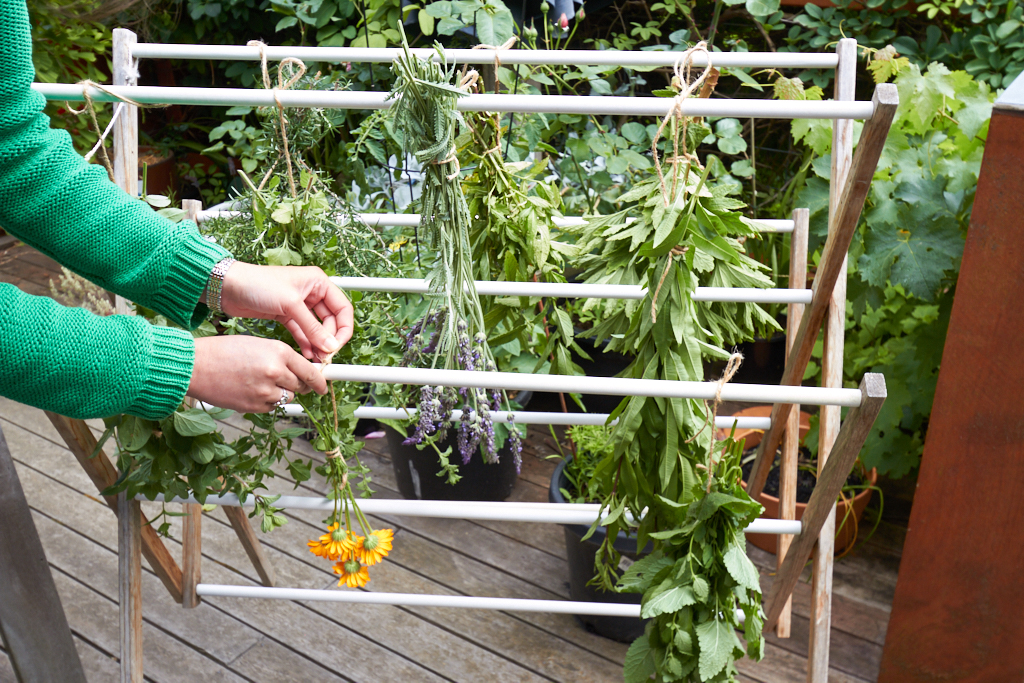
Leaves and flowers are best dried in one of three ways: either tied in small bunches and hung in an appropriate place, spread on well-ventilated trays or in small amounts in conventional ovens. The method used will depend on the herb being harvested and what sort of spaces you have. Pick herbs in the morning after any moisture has evaporated.
Hang bunches in the kitchen, away from cooking fumes or steam; from the eaves of a verandah; or in a garage, spare room, or airing/clothes-drying cabinet – in fact, anywhere where the basic requirements are met. I quite often tie the bunches to my clothes horse. That way they can be moved into a shady dry position with good air movement during the day, and into a more sheltered position over night. In good weather, they should be dry in about 10 days.
Spread smaller flowers and the more brittle leaves on racks, which consist of a solid frame covered in netting, hessian, muslin, flywire or some similar material. Old flywire window screens are ideal. Don’t put too many herbs on each tray as this will lengthen the drying time. It will also help if you turn them occasionally. The trays can be stacked on top of each other, as long as some space is left between them. If you’ve only got a handful of petals, just spread them on some brown paper in a shaded position.
Small amounts of leaves and flowers can also be dried in a slow oven. Spread the herbs on trays, or brown paper with holes in it, and set the oven at a temperature not exceeding 40°C; leave the oven door slightly ajar to allow the excess moisture to escape. Check and turn the herbs occasionally. The leaves are dry when they are brittle but do not shatter, and flower petals when they feel papery and slightly crisp.
Drying seeds
Spread seeds on saucers or paper, or hung in bunches in paper bags to dry. They are better left to dry naturally. They will take longer than the leaves and flowers – anything from 3–6 weeks – but otherwise should be treated the same way.
Using dried herbs
Although all these drying methods take time and a little care, it is well worth the effort because the herbs have so much more flavour than those bought in supermarkets or health food shops.
The aromatic oils of dried herbs are much more concentrated than those of fresh herbs, so use dried herbs in smaller amounts: usually one-third to one-quarter of the amount that would be used if the herb was fresh.
Storage
Store dried herbs in airtight containers as soon as they are dry so they don’t re-absorb moisture from the air. Carefully remove the leaves from the stems and try to avoid crushing them too much as this lessens their aromatic qualities. Clear glass jars with well-fitting lids are the best containers to use because they allow you to watch for condensation, a sign that the herbs are not completely dry and should be removed and dried for a little longer. Keep the jars in a dark cupboard or pantry, as direct light will fade the colours and diminish the quality of the herbs. The shelf life of home-dried herbs is generally around 12 months. Always label your jars with the name of the herb and the date it was dried. Large amounts of herbs can be stored in well-sealed plastic bags, but again keep them away from direct light.

